Lootboxes: Difference between revisions
No edit summary |
|||
| Line 2: | Line 2: | ||
<span style="font-size: 200%; color: white;">'''Hover over a Lootbox to see its Rewards!'''</span> | <span style="font-size: 200%; color: white;">'''Hover over a Lootbox to see its Rewards!'''</span> | ||
==Map #4 Special Bundles== | ==Map #4 Special Bundles== | ||
<div style="text-align:left; padding:8px;"> | |||
<div style="display:inline-block; vertical-align:middle;"> | |||
<div class="tooltip-wrapper" style="width:84px;height:84px;position:relative;margin:0;border:none;"> | |||
[[File:1x1GUI.png|64px|64px|link=]] | |||
<div class="foreground-icon" style="position:absolute;top:30%;left:45%;transform:translate(-50%,-50%);width:48px;height:48px;"> | |||
[[File:Eyeender.png|48px|link=]] | |||
<span class="tooltip-text">[[File:GridIron Glory.png|300px|link=]]</span> | |||
</div> | |||
</div> | |||
</div> | |||
<div style="display:inline-block; vertical-align:middle; margin-left:5px;"> | |||
'''Gridiron Glory''' | '''Gridiron Glory''' | ||
</div> | |||
</div> | |||
<div style="text-align:left; padding:8px;"> | |||
<div style="display:inline-block; vertical-align:middle;"> | |||
<div class="tooltip-wrapper" style="width:84px;height:84px;position:relative;margin:0;border:none;"> | |||
[[File:1x1GUI.png|64px|64px|link=]] | |||
<div class="foreground-icon" style="position:absolute;top:30%;left:45%;transform:translate(-50%,-50%);width:48px;height:48px;"> | |||
[[File:Eyeender.png|48px|link=]] | |||
<span class="tooltip-text">[[File:LootboxVengefulValentine.png|300px|link=]]</span> | |||
</div> | |||
</div> | |||
</div> | |||
<div style="display:inline-block; vertical-align:middle; margin-left:5px;"> | |||
'''Vengeful Valentine''' | '''Vengeful Valentine''' | ||
</div> | |||
</div> | |||
<div style="text-align:left; padding:8px;"> | |||
<div style="display:inline-block; vertical-align:middle;"> | |||
<div class="tooltip-wrapper" style="width:84px;height:84px;position:relative;margin:0;border:none;"> | |||
[[File:1x1GUI.png|64px|64px|link=]] | |||
<div class="foreground-icon" style="position:absolute;top:30%;left:45%;transform:translate(-50%,-50%);width:48px;height:48px;"> | |||
[[File:Eyeender.png|48px|link=]] | |||
<span class="tooltip-text">[[File:Map4CarnageCache.png|300px|link=]]</span> | |||
</div> | |||
</div> | |||
</div> | |||
<div style="display:inline-block; vertical-align:middle; margin-left:5px;"> | |||
'''Carnage Cache''' | '''Carnage Cache''' | ||
</div> | |||
</div> | |||
==Map #3 Lootboxes== | ==Map #3 Lootboxes== | ||
Revision as of 04:12, 25 March 2025
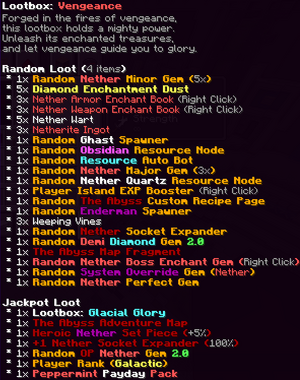
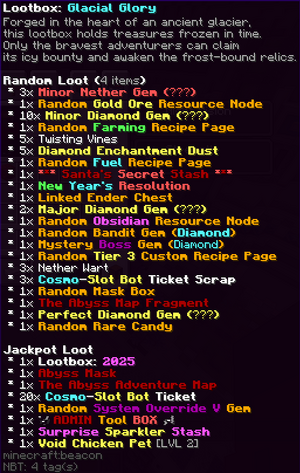
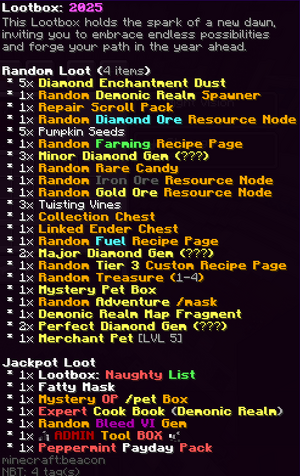
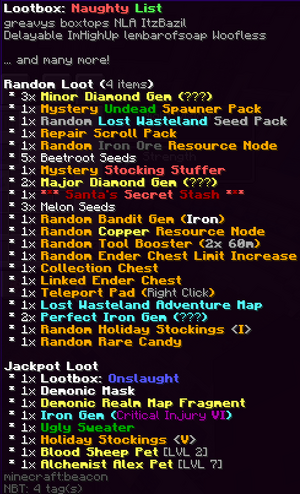
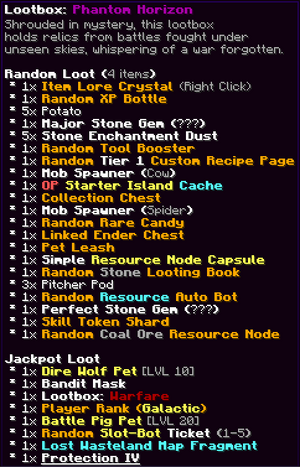
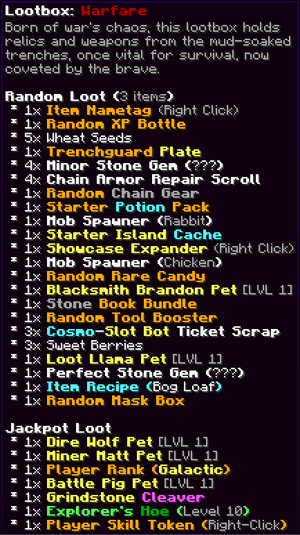
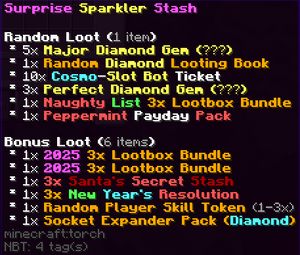
Lootboxes are special boxes with items that change weekly and are available for purchase in the store during weekends. Hovering over a Lootbox reveals its contents, which are divided into three categories: Random Loot, Jackpot Loot, and Bonus Loot. Random Loot includes a variety of items depending on the Lootbox theme. Jackpot Loot features rare and exclusive top-tier items, while Bonus Loot adds cosmetic rewards for extra flair. To open a Lootbox, simply right-click on it. Once opened, you will receive random items from its list, and all rolled items are automatically added to your inventory for use.
Hover over a Lootbox to see its Rewards!
Map #4 Special Bundles
![]()
![]()
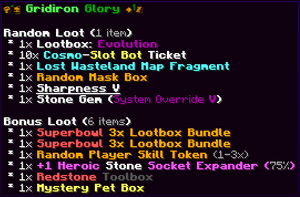
Gridiron Glory
![]()
![]()
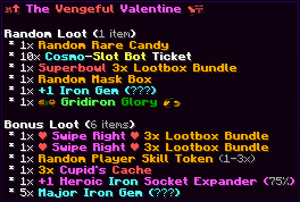
Vengeful Valentine
![]()
![]()
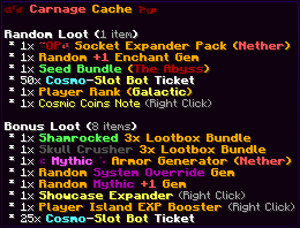
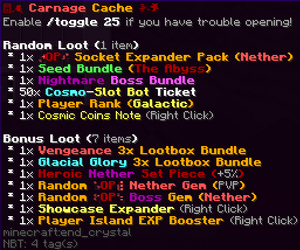
Carnage Cache
Map #3 Lootboxes
| Lootbox | 3x Bundle | Release Date |
|---|---|---|
 |
 3x Bundle 3x Bundle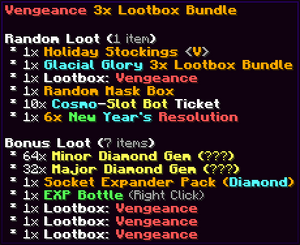 |
17th January 2025 |
 |
3x Bundle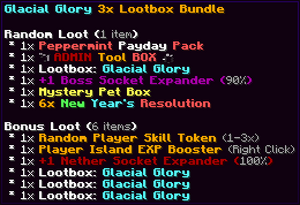 |
10th January 2025 |
 |
3x Bundle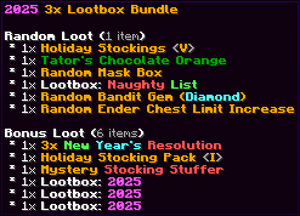 |
1st January 2025 |
 |
3x Bundle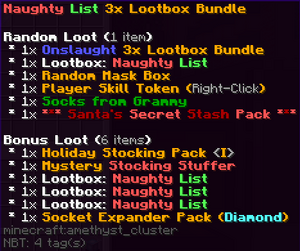 |
25th December 2024 |
 |
3x Bundle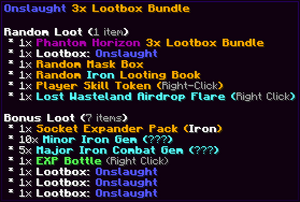 |
20th December 2024 |
 |
3x Bundle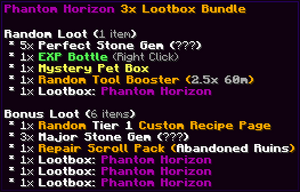 |
15th December 2024 |
 |
3x Bundle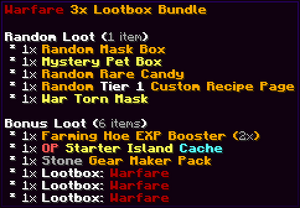 |
13th December 2024 |
Map #3 Special Bundles
Peppermint Paddy

|
 |
Surprise Sparkler Stash
|
|
 |
Carnage Cache
|
|
 |
Map #2 Lootboxes
| Lootbox | 3x Bundle | Release Date |
|---|---|---|
 |
3x Bundle |
25th October 2024 |
 |
3x Bundle |
18th October 2024 |
 |
3x Bundle |
11th October 2024 |
 |
3x Bundle |
6th October 2024 |
 |
3x Bundle |
4th October 2024 |
Map #1 Lootboxes
| Lootbox | 3x Bundle | Release Date |
|---|---|---|
 |
3x Bundle |
30th August 2024 |
 |
3x Bundle |
23rd August 2024 |
 |
3x Bundle |
16th August 2024 |
 |
3x Bundle |
9th August 2024 |
 |
3x Bundle |
2nd August 2024 |
 |
3x Bundle |
28th July 2024 |
 |
3x Bundle |
26th July 2024 |
Special Bundles
| Lootbox | Release Date |
|---|---|
 |
31st October 2024 |
 |
6th October 2024 |
 |
23rd August 2024 |