The Facility: Difference between revisions
| (29 intermediate revisions by the same user not shown) | |||
| Line 1: | Line 1: | ||
<noinclude>[[Category:Templates]]</noinclude> | <noinclude>[[Category:Templates]]</noinclude> | ||
[[File:TheFacility.jpg|right|600px|link=]] | [[File:TheFacility.jpg|right|600px|link=]] | ||
'''The Facility''' | Buried deep beneath the surface lies a long-forgotten facility—once a hub of scientific innovation, now shrouded in silence and secrecy. Hidden from the prying eyes of the Marauders, it was abandoned after an unknown incident plunged its corridors into chaos. The reason for the downfall? Lost to time. That is, until one daring cosmonaut emerged from the depths clutching a strange artifact: an unmarked keycard... The race is on to uncover these keycards and unlock the secrets of what lies within... '''The Facility'''. | ||
=What is The Facility= | |||
The Facility is a brand new Adventure-type world, which can only be accessed for a limited time using a '''Facility Access Card''' on the Facility Door found within the [[Abandoned Ruins]] '''[[Adventures|/adventure]]''' or the [[Lost Wasteland]] '''[[Adventures|/adventure]]. | |||
== | * Facility Access Cards have limited usages and must have '''<span style="color:#FFAA00">[[Science|Science Gold]]</span>''' [[File:GoldIngot.webp|24px|link=]] applied to enter The Facility. | ||
The Facility | * Inside of The Facility, players have a limited amount of time (seen on your scoreboard) to explore the various rooms within the 3 main color-coded sections of the building. | ||
* The Facility is a fully '''<span style="color:#FFFF55">NEUTRAL</span>''' area, with a lawful spawnpoint. | |||
* Each of the 3 sections is themed and color-coded based on its Marauders, loot tiers, and build style: | |||
** '''<span style="color:#FF55FF">Construction (PINK)</span>''': [[Custom Recipes]] & Island [[Automation]]-themed loot. | |||
** '''<span style="color:#55FF55">Excavation (GREEN)</span>''': [[Island Skills]] & Resource-themed loot (CHAIN, IRON, and DIAMOND resources). | |||
** '''<span style="color:#FF5555">Laboratories (RED)</span>''': [[Enchants|Enchanting]] & Gear-Building loot (CHAIN and IRON tiered items). | |||
= Map of The Facility = | |||
[[File:FacilitiesMap.png|right|500px|link=]] | |||
In the Facility there are 4 Main Zones. | |||
* '''<span style="color:#FFFF00">Spawn (Yellow Highlight)</span>''': Safe-Zone area. You cannot take damage here from mobs or players. | |||
In | |||
* | |||
<br> | <br> | ||
* '''<span style="color:#FF55FF">Construction (PINK Highlight)</span>''': Neutral Alligned Zone, Consctruction Mobs Spawn here. | |||
<br> | <br> | ||
* '''<span style="color:#55FF55">Excavation (GREEN Highlight)</span>''': Neutral Alligned Zone, Excavation Mobs Spawn here. | |||
<br> | <br> | ||
* '''<span style="color:#FF5555">Laboratories (RED Highlight)</span>''':Neutral Alligned Zone, Laboratories Mobs Spawn here. | |||
<br> | <br> | ||
* Snaking pathways lead from the central room to unique areas filled with powerful Mobs. | |||
=Entering The Facility= | |||
[[File:TheFacilityInside.jpg|right|600px|link=]] | |||
In order to enter The Facility, you must first obtain a '''Facility Access Card'''—found within the [[Adventures]] in various loot tiers. | |||
<br> | |||
[[File:FacilityAccessCard.png|450px|link=]] | |||
* Each Facility Access Card has a limited number of uses, which decreases by 1 each time you enter The Facility. | |||
* Access Cards also have [[Science|Science Charges]], which are consumed upon entry to determine how much time you have inside The Facility. | |||
* Access Cards are guaranteed to be kept on Neutral death. | |||
* Apply '''<span style="color:#FFAA00">Science Gold Ingots</span>''' to the Facility Keycard to increase these charges. A minimum of 5 [[Science]] Gold [[File:GoldIngot.webp|24px|link=]] charges is required to enter. | |||
<br><br><br><br> | |||
=The Facility Entrance= | |||
The entrance to The Facility can be found within the Neutral Zone of the adventure corresponding to the currently unlocked Facility tier (e.g., [[Abandoned Ruins]] for Chain, [[Lost Wasteland]] for Iron). | |||
* Right-click the '''Lectern Keypad''' with your valid Facility Access Card to initiate a Facility Transport. | |||
* Upon activation, an alert is sent to all Cosmonauts within The Facility. | |||
* The Facility doors will open to the '''Transport Room''', allowing any nearby player with a valid card to enter. | |||
* The Facility Transport takes 30 seconds to complete. All players in the Transport Room with a valid card will be transported to The Facility; others are returned outside. | |||
* Players within the Transport Room are transported regardless of Combat status. | |||
* Having multiple Access Cards does not increase your time in The Facility—only one card is consumed per entry. | |||
* Use /facility in-game to view which Facility tier is currently unlocked before entering. | |||
=Inside of The Facility= | |||
Once inside, you are set to '''<span style="color:##FFFFFF">LAWFUL</span>''' in the central Facility room. Venturing outside sets you to '''<span style="color:#FFFF55">NEUTRAL</span>''' for the duration of your exploration. | |||
* Snaking pathways lead from the central room to unique areas filled with powerful Mobs. | |||
* Escape is only possible through one of three '''Exit Portals''' located in each section of the Facility. | * Escape is only possible through one of three '''Exit Portals''' located in each section of the Facility. | ||
=Facility Mobs= | |||
* Mobs inside | * Mobs inside The Facility are stronger than Mythic-tier mobs in normal [[Adventures]]. | ||
* All mobs share the same HP and Damage stats. | * All mobs share the same HP and Damage stats. | ||
* Captains and Generals do not spawn within The Facility. | * Captains and Generals do not spawn within The Facility. | ||
=Facility Loot= | |||
Loot is determined by the section of The Facility you are in and the types of mobs you kill: | Loot is determined by the section of The Facility you are in and the types of mobs you kill: | ||
* '''Hitlist''': | |||
** <span style="color:#FF5555">Red Hitlist</span>: 50 kills. | |||
** <span style="color:#55FF55">Green Hitlist</span>: 50 kills. | |||
** <span style="color:#FF55FF">Pink Hitlist</span>: 200 kills. (Rewards a chest containing 2 items from that tier's Loot Table) | |||
* ''' | * '''Bossbar''': | ||
** <span style="color:#FF5555">Red Bossbar</span>: 100 Points. | |||
** <span style="color:#55FF55">Green Bossbar</span>: 100 Points. | |||
** <span style="color:#FF55FF">Pink Bossbar</span>: 250 Points. | |||
** Each mob gives 1 Bossbar point on kill. | |||
* ''' | * '''System Override''': | ||
** On proc, System Override grants multiples of the same tier of loot instead of upgrading the tier. | |||
** Only stone weapons with System Override work in The Facility. | |||
* ''' | =The Centrifuge= | ||
[[File:TheCentrifuge.png|right|450px|link=]] | |||
Behold! The Facility scientists' revolutionary new invention! After much trial and error, these mysterious workers have discovered a way to upgrade '''<span style="color:#55FFFF">Random Perfect Gems</span>''' into their '''MAX +1''' variants. | |||
The '''Centrifuge''' is a new Custom Block that exists in each zone of '''The Facility'''.<br> | |||
* In order to have a chance at activating the Centrifuge, players must kill '''25 Marauders''' within a '''25-block radius''' of the block. | |||
* If the block fails to activate, the activation progress will '''reset''', and players must try again. | |||
* Once activated, players can insert a '''<span style="color:#55FFFF">Random Perfect Enchant Gem</span>''' to have a chance at upgrading it to a '''Random MAX +1 Gem'''. | |||
* After each upgrade interaction, the Centrifuge will be placed on a '''1-hour cooldown'''. | |||
* If a Perfect Gem fails to upgrade, it will be '''destroyed''' in the process. | |||
* If the Centrifuge fails to upgrade a gem, its success chance will '''increase''' the next time it's used. | |||
* If a gem successfully upgrades, the Centrifuge will '''reset to its base upgrade-chance'''. | |||
'''Be careful!''' Failed upgrades mean the gem is lost forever. | |||
= [[AetherTech]] Enchantments = | |||
[[File:AetherTechLore.png|right|400px|link=AetherTech]] | |||
<span style="color:#FFFF55;">'''Aether'''</span><span style="color:#FFAA00;">'''Tech'''</span> is a unique enchantment tier available exclusively in [[The Facility]]. | |||
* Found only via the [[#Golden Forge|Golden Forge]] in The Facility. | |||
* Requires both '''Player EXP''' [[File:Enchantbottle.gif|24px|link=]] and '''Science Gold''' [[File:GoldIngot.webp|24px|link=]] to activate and use. | |||
* Only compatible with '''AetherTech Sockets'''. Other enchant types cannot be applied to these sockets. | |||
* Players must have a '''Science Gold Satchel''' equipped and toggled ON to power the enchantments during combat. | |||
* Gems come in tiers ('''Minor''', '''Major''', '''Perfect''') and have unique power scaling. | |||
See full enchantment list at: '''[[AetherTech|AetherTech Enchantments Page]]''' | |||
= Golden Forge = | |||
[[File:GoldenForge.png|right|400px|link=AetherTech]] | |||
Located deep within '''The Facility''', the '''Golden Forge''' is the only way to unlock <span style="color:#FFFF55;">'''Aether'''</span><span style="color:#FFAA00;">'''Tech'''</span> Enchantments. | |||
* Insert a gem to reveal a random enchantment. | |||
* Costs scale based on gem tier and type: | |||
** '''Player EXP''' [[File:Enchantbottle.gif|24px|link=]] | |||
** '''Science Gold''' [[File:GoldIngot.webp|24px|link=]] | |||
* Only unlocked enchantments may be applied, and only to gear with AetherTech Sockets. | |||
= The Stalker Boss = | |||
[[File:TheStalkerBoss.png|right|400px|link=]] | |||
Lurking just beyond your line of sight, '''The Stalker''' is the mysterious new boss hidden deep within '''The Facility'''. The eerie feeling of being watched as you navigate its corridors is no longer a trick of the mind—he’s real, and he’s hunting. | |||
== How to Summon the Stalker == | |||
To challenge The Stalker, players must engage in a multi-step process within the currently active '''/facility''' instance: | |||
* Defeat regular Facility mobs to gradually build up '''Corruption Progress'''—visible on your scoreboard. | |||
* Once full, a '''Corrupted Mob''' will spawn, themed to the current zone you're in. | |||
* Each Corrupted Mob drops one of three unique '''Corrupted Components'''. | |||
* Combine all three components to craft a '''Facility Corruption Core'''. | |||
* Take the Corruption Core to the '''Summoning Altar''' located in '''The Facility''' and activate it to summon The Stalker. | |||
''Note: Corrupted Components and Corruption Cores are bound to the Facility and cannot be removed.'' | |||
<span style="font-size:1.25em;">'''Boss Mechanics & Phases'''</span> <br> | |||
The Stalker is swift, cunning, and unpredictable. Prepare for high-intensity mechanics and movement-based reactions. His abilities include: | |||
* '''Diffuser''' – Quickly find and disarm planted explosives or suffer heavy AoE damage. | |||
* '''Stalker's Gaze''' – Looking directly at The Stalker during this phase applies stacking damage over time (DOT). Break line of sight to survive. | |||
* '''Void Trap''' – Expanding smoke rings damage all players caught inside. Position carefully. | |||
* '''Hunting Phase''' – The Stalker vanishes into darkness. Jumping at the right moment is your only defense. | |||
* '''Attack Phase''' – A relentless, high-damage assault where The Stalker targets players directly. | |||
* '''Stalking Mode''' – A deceptive calm where The Stalker observes. If he reaches you undetected, he grows in power. | |||
<br> | |||
<span style="font-size:1.25em;">'''Availability & Loot'''</span> | |||
* The Stalker can be summoned in '''Chain''', '''Iron''', and '''Diamond''' Facility tiers starting on the day each tier unlocks. | |||
* Summons are limited to '''once every 20 minutes''' across all players in the instance. | |||
* Loot from The Stalker scales with the tier of the Facility, offering high-value rewards appropriate to Chain, Iron, or Diamond gear progression. | |||
=Facility Unlock on /levelcap= | |||
* Abandoned Ruins Facility unlocks at '''<span style="color:#FFFF55">Day #15</span>''' on /levelcap, alongside Lost Wasteland Heroic loot and Island Level 25. | |||
* Lost Wasteland Facility unlocks at '''<span style="color:#FFFF55">Day #29</span>''' on /levelcap. | |||
=Facility Rotation= | |||
The Facility alternates between Chain and Iron variants throughout the season: | |||
* Chain Facility is available starting at Day #15 of the season. | |||
* On Day #29, the Facility rotates to the Iron Facility. | |||
* After Day #29, the Facility toggles between Chain and Iron every 3 days. | |||
* When the Iron Facility is unlocked, players must use a Lost Wasteland Facility Access Card in the Lost Wasteland adventure to enter. | |||
* Mobs, loot tables, and overall difficulty adjust based on the unlocked Facility tier. | |||
* Use '''/facility''' to view which variant is currently active and preview its loot. | |||
Latest revision as of 03:14, 25 July 2025
Buried deep beneath the surface lies a long-forgotten facility—once a hub of scientific innovation, now shrouded in silence and secrecy. Hidden from the prying eyes of the Marauders, it was abandoned after an unknown incident plunged its corridors into chaos. The reason for the downfall? Lost to time. That is, until one daring cosmonaut emerged from the depths clutching a strange artifact: an unmarked keycard... The race is on to uncover these keycards and unlock the secrets of what lies within... The Facility.
What is The Facility
The Facility is a brand new Adventure-type world, which can only be accessed for a limited time using a Facility Access Card on the Facility Door found within the Abandoned Ruins /adventure or the Lost Wasteland /adventure.
- Facility Access Cards have limited usages and must have Science Gold
 applied to enter The Facility.
 - Inside of The Facility, players have a limited amount of time (seen on your scoreboard) to explore the various rooms within the 3 main color-coded sections of the building.
- The Facility is a fully NEUTRAL area, with a lawful spawnpoint.
- Each of the 3 sections is themed and color-coded based on its Marauders, loot tiers, and build style:
- Construction (PINK): Custom Recipes & Island Automation-themed loot.
- Excavation (GREEN): Island Skills & Resource-themed loot (CHAIN, IRON, and DIAMOND resources).
- Laboratories (RED): Enchanting & Gear-Building loot (CHAIN and IRON tiered items).
Map of The Facility
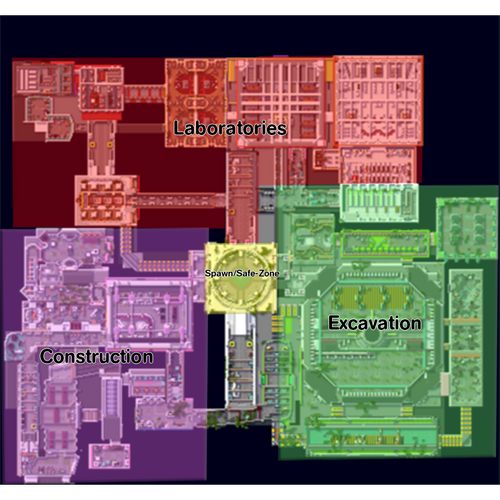
In the Facility there are 4 Main Zones.
- Spawn (Yellow Highlight): Safe-Zone area. You cannot take damage here from mobs or players.
- Construction (PINK Highlight): Neutral Alligned Zone, Consctruction Mobs Spawn here.
- Excavation (GREEN Highlight): Neutral Alligned Zone, Excavation Mobs Spawn here.
- Laboratories (RED Highlight):Neutral Alligned Zone, Laboratories Mobs Spawn here.
Entering The Facility
In order to enter The Facility, you must first obtain a Facility Access Card—found within the Adventures in various loot tiers.
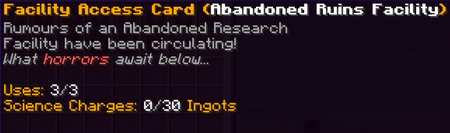
- Each Facility Access Card has a limited number of uses, which decreases by 1 each time you enter The Facility.
- Access Cards also have Science Charges, which are consumed upon entry to determine how much time you have inside The Facility.
- Access Cards are guaranteed to be kept on Neutral death.
- Apply Science Gold Ingots to the Facility Keycard to increase these charges. A minimum of 5 Science Gold charges is required to enter.
The Facility Entrance
The entrance to The Facility can be found within the Neutral Zone of the adventure corresponding to the currently unlocked Facility tier (e.g., Abandoned Ruins for Chain, Lost Wasteland for Iron).
- Right-click the Lectern Keypad with your valid Facility Access Card to initiate a Facility Transport.
- Upon activation, an alert is sent to all Cosmonauts within The Facility.
- The Facility doors will open to the Transport Room, allowing any nearby player with a valid card to enter.
- The Facility Transport takes 30 seconds to complete. All players in the Transport Room with a valid card will be transported to The Facility; others are returned outside.
- Players within the Transport Room are transported regardless of Combat status.
- Having multiple Access Cards does not increase your time in The Facility—only one card is consumed per entry.
- Use /facility in-game to view which Facility tier is currently unlocked before entering.
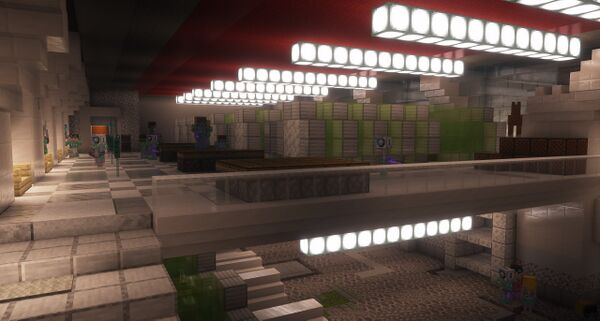
Inside of The Facility
Once inside, you are set to LAWFUL in the central Facility room. Venturing outside sets you to NEUTRAL for the duration of your exploration.
- Snaking pathways lead from the central room to unique areas filled with powerful Mobs.
- Escape is only possible through one of three Exit Portals located in each section of the Facility.
Facility Mobs
- Mobs inside The Facility are stronger than Mythic-tier mobs in normal Adventures.
- All mobs share the same HP and Damage stats.
- Captains and Generals do not spawn within The Facility.
Facility Loot
Loot is determined by the section of The Facility you are in and the types of mobs you kill:
- Hitlist:
- Red Hitlist: 50 kills.
- Green Hitlist: 50 kills.
- Pink Hitlist: 200 kills. (Rewards a chest containing 2 items from that tier's Loot Table)
- Bossbar:
- Red Bossbar: 100 Points.
- Green Bossbar: 100 Points.
- Pink Bossbar: 250 Points.
- Each mob gives 1 Bossbar point on kill.
- System Override:
- On proc, System Override grants multiples of the same tier of loot instead of upgrading the tier.
- Only stone weapons with System Override work in The Facility.
The Centrifuge
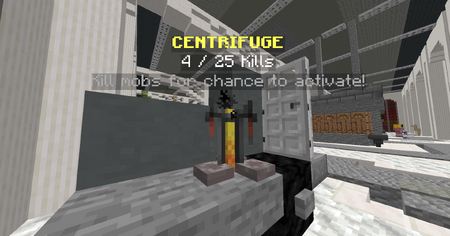
Behold! The Facility scientists' revolutionary new invention! After much trial and error, these mysterious workers have discovered a way to upgrade Random Perfect Gems into their MAX +1 variants.
The Centrifuge is a new Custom Block that exists in each zone of The Facility.
- In order to have a chance at activating the Centrifuge, players must kill 25 Marauders within a 25-block radius of the block.
- If the block fails to activate, the activation progress will reset, and players must try again.
- Once activated, players can insert a Random Perfect Enchant Gem to have a chance at upgrading it to a Random MAX +1 Gem.
- After each upgrade interaction, the Centrifuge will be placed on a 1-hour cooldown.
- If a Perfect Gem fails to upgrade, it will be destroyed in the process.
- If the Centrifuge fails to upgrade a gem, its success chance will increase the next time it's used.
- If a gem successfully upgrades, the Centrifuge will reset to its base upgrade-chance.
Be careful! Failed upgrades mean the gem is lost forever.
AetherTech Enchantments
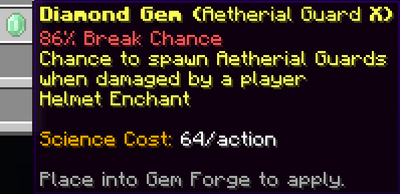
AetherTech is a unique enchantment tier available exclusively in The Facility.
- Found only via the Golden Forge in The Facility.
- Requires both Player EXP
 and Science Gold to activate and use.
 - Only compatible with AetherTech Sockets. Other enchant types cannot be applied to these sockets.
- Players must have a Science Gold Satchel equipped and toggled ON to power the enchantments during combat.
- Gems come in tiers (Minor, Major, Perfect) and have unique power scaling.
See full enchantment list at: AetherTech Enchantments Page
Golden Forge

Located deep within The Facility, the Golden Forge is the only way to unlock AetherTech Enchantments.
- Insert a gem to reveal a random enchantment.
- Costs scale based on gem tier and type:
- Player EXP
- Science Gold
- Player EXP
- Only unlocked enchantments may be applied, and only to gear with AetherTech Sockets.
The Stalker Boss
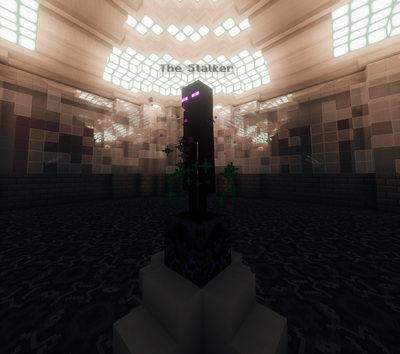
Lurking just beyond your line of sight, The Stalker is the mysterious new boss hidden deep within The Facility. The eerie feeling of being watched as you navigate its corridors is no longer a trick of the mind—he’s real, and he’s hunting.
How to Summon the Stalker
To challenge The Stalker, players must engage in a multi-step process within the currently active /facility instance:
- Defeat regular Facility mobs to gradually build up Corruption Progress—visible on your scoreboard.
- Once full, a Corrupted Mob will spawn, themed to the current zone you're in.
- Each Corrupted Mob drops one of three unique Corrupted Components.
- Combine all three components to craft a Facility Corruption Core.
- Take the Corruption Core to the Summoning Altar located in The Facility and activate it to summon The Stalker.
Note: Corrupted Components and Corruption Cores are bound to the Facility and cannot be removed.
Boss Mechanics & Phases
The Stalker is swift, cunning, and unpredictable. Prepare for high-intensity mechanics and movement-based reactions. His abilities include:
- Diffuser – Quickly find and disarm planted explosives or suffer heavy AoE damage.
- Stalker's Gaze – Looking directly at The Stalker during this phase applies stacking damage over time (DOT). Break line of sight to survive.
- Void Trap – Expanding smoke rings damage all players caught inside. Position carefully.
- Hunting Phase – The Stalker vanishes into darkness. Jumping at the right moment is your only defense.
- Attack Phase – A relentless, high-damage assault where The Stalker targets players directly.
- Stalking Mode – A deceptive calm where The Stalker observes. If he reaches you undetected, he grows in power.
Availability & Loot
- The Stalker can be summoned in Chain, Iron, and Diamond Facility tiers starting on the day each tier unlocks.
- Summons are limited to once every 20 minutes across all players in the instance.
- Loot from The Stalker scales with the tier of the Facility, offering high-value rewards appropriate to Chain, Iron, or Diamond gear progression.
Facility Unlock on /levelcap
- Abandoned Ruins Facility unlocks at Day #15 on /levelcap, alongside Lost Wasteland Heroic loot and Island Level 25.
- Lost Wasteland Facility unlocks at Day #29 on /levelcap.
Facility Rotation
The Facility alternates between Chain and Iron variants throughout the season:
- Chain Facility is available starting at Day #15 of the season.
- On Day #29, the Facility rotates to the Iron Facility.
- After Day #29, the Facility toggles between Chain and Iron every 3 days.
- When the Iron Facility is unlocked, players must use a Lost Wasteland Facility Access Card in the Lost Wasteland adventure to enter.
- Mobs, loot tables, and overall difficulty adjust based on the unlocked Facility tier.
- Use /facility to view which variant is currently active and preview its loot.