Abandoned Ruins: Difference between revisions
No edit summary |
|||
| (7 intermediate revisions by 2 users not shown) | |||
| Line 1: | Line 1: | ||
[[file: | __NOTOC__ | ||
Abandoned Ruins is the 1st Adventure Map on Cosmic Sky. This adventure is unlocked by | [[file:AbandonedRuinsMap2.png|right||600px]] | ||
The Abandoned Ruins is the 1st Adventure Map on Cosmic Sky. This adventure is unlocked by all players. | |||
This adventure is limited to Stone Weapons and Chain Armor | |||
Tis adventure is divided into different zones, each with specific rules and risks. These zones are marked on the map to help you understand where you are and what to expect. | |||
=== <span style="color:#55FF55;">Safe Zones (Green Highlight)</span> === | |||
Safe Zones are completely safe areas where PvP is disabled. You cannot take or deal damage, making these zones ideal for spawning, organizing, or preparing for your next move. | |||
=== <span style="color:#FFFFFF;">Lawful Zones (White Highlight)</span> === | |||
Lawful Zones are areas where PvP is limited. If you are a lawful player, you cannot attack or be attacked by neutral or chaotic players. However, neutral and chaotic players can still engage in PvP with each other. | |||
=== <span style="color:#FFAA00;">PvP Zones (No Highlight)</span> === | |||
In PvP Zones, combat is enabled for everyone. Lawful, neutral, and chaotic players can all attack and be attacked. These areas are high-risk and great for players looking for action and rewards. | |||
=== <span style="color:#FFFF00;">Chaotic Zone Warning (Yellow Highlight)</span> === | |||
Yellow-highlighted areas indicate you are approaching the Chaotic Zone at the center of the map. This is a warning to prepare yourself or turn back if you’re not ready for the risks ahead. | |||
=== <span style="color:#FF0000;">Chaotic Zone (Red Highlight)</span> === | |||
The Chaotic Zone is the most dangerous part of the Abandoned Ruins. Entering this area will turn you chaotic, and if you die here, you lose everything in your inventory. Only venture into the Chaotic Zone if you are ready to face the ultimate challenge. | |||
=== Point of Intrest List === | === Point of Intrest List === | ||
{| class="wikitable sortable" style="width: | {| class="wikitable sortable" style="width: 25%;" | ||
! '''Name''' | ! '''Name''' | ||
! '''Coords''' | ! '''Coords''' | ||
|- | |- | ||
| Ironfang Siege Post || <div align="center"> -463, -52 | | Ironfang Siege Post || <div align="center"> -463, -52 </div> | ||
|- | |- | ||
| Outlaws Barricade || <div align="center"> -445, -279 | | Outlaws Barricade || <div align="center"> -445, -279 </div> | ||
|- | |- | ||
| Stonefang Castle || <div align="center"> -43, -438 | | Stonefang Castle || <div align="center"> -43, -438 </div> | ||
|- | |- | ||
| Infernos Rest || <div align="center"> 274, -172 | | Infernos Rest || <div align="center"> 274, -172 </div> | ||
|- | |- | ||
| Emberclaw Hold || <div align="center"> 260, -426 | | Emberclaw Hold || <div align="center"> 260, -426 </div> | ||
|- | |- | ||
| Bandits Keep || <div align="center"> 264, 347 | | Bandits Keep || <div align="center"> 264, 347 </div> | ||
|- | |- | ||
| Blackthorn Keep || <div align="center"> 249, 176 | | Blackthorn Keep || <div align="center"> 249, 176 </div> | ||
|- | |- | ||
| Grimwood Retreat || <div align="center"> 188, -91 | | Grimwood Retreat || <div align="center"> 188, -91 </div> | ||
|- | |- | ||
| Driftwood Fortress || <div align="center"> -137, -154 | | Driftwood Fortress || <div align="center"> -137, -154 </div> | ||
|- | |- | ||
| Old Man's House || <div align="center"> -136, 21 | | Old Man's House || <div align="center"> -136, 21 </div> | ||
|- | |- | ||
| Church House || <div align="center"> 319, 449 | | Church House || <div align="center"> 319, 449 </div> | ||
|- | |- | ||
| Scorched Hollow || <div align="center"> 184, -298 | | Scorched Hollow || <div align="center"> 184, -298 </div> | ||
|- | |- | ||
| The Ruined Castle || <div align="center"> -265, 362 | | The Ruined Castle || <div align="center"> -265, 362 </div> | ||
|- | |- | ||
| Ashenvale || <div align="center"> 395, -205 | | Ashenvale || <div align="center"> 395, -205 </div> | ||
|- | |- | ||
| Marketplace || <div align="center"> 83, 355 | | Marketplace || <div align="center"> 83, 355 </div> | ||
|- | |- | ||
| Rivervale Village || <div align="center"> -281, -399 | | Rivervale Village || <div align="center"> -281, -399 </div> | ||
|- | |- | ||
| Gusty Grove || <div align="center"> -304, -42 | | Gusty Grove || <div align="center"> -304, -42 </div> | ||
|- | |- | ||
| The King's Castle || <div align="center"> 63, -50 | | The King's Castle || <div align="center"> 63, -50 </div> | ||
|- | |- | ||
| Outlaws Hollow || <div align="center"> 417, 132 | | Outlaws Hollow || <div align="center"> 417, 132 </div> | ||
|- | |- | ||
| Rogues Refuge || <div align="center"> -235, 140 | | Rogues Refuge || <div align="center"> -235, 140 </div> | ||
|- | |- | ||
| The Drowned Shacks || <div align="center"> 429, -11 | | The Drowned Shacks || <div align="center"> 429, -11 </div> | ||
|- | |- | ||
| Withered Tower || <div align="center"> -60, 331 | | Withered Tower || <div align="center"> -60, 331 </div> | ||
|} | |} | ||
=Bandit King= | =Bandit King= | ||
[[File:BanditKing.png|600px]] <br> | [[File:BanditKing.png|600px|link=]] <br> | ||
Location: The Bandit King is found in the center castle of first instance of the Abandoned Ruins Adventure. | Location: The Bandit King is found in the center castle of the first instance of the Abandoned Ruins Adventure. | ||
Revision as of 22:43, 21 December 2024

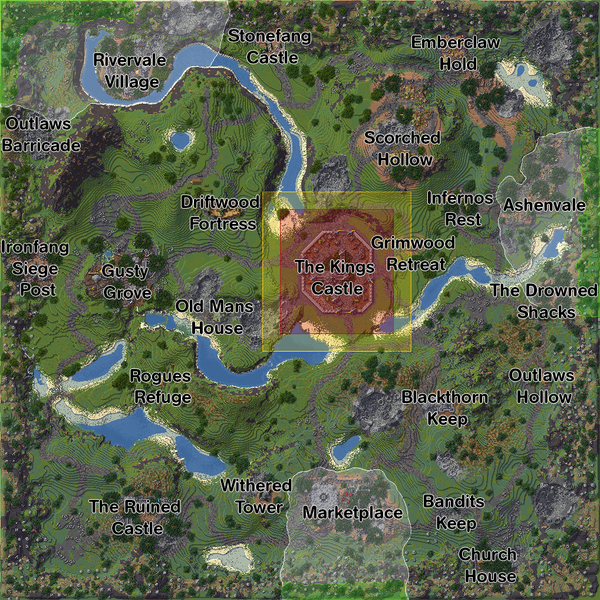
The Abandoned Ruins is the 1st Adventure Map on Cosmic Sky. This adventure is unlocked by all players.
This adventure is limited to Stone Weapons and Chain Armor Tis adventure is divided into different zones, each with specific rules and risks. These zones are marked on the map to help you understand where you are and what to expect.
Safe Zones (Green Highlight)
Safe Zones are completely safe areas where PvP is disabled. You cannot take or deal damage, making these zones ideal for spawning, organizing, or preparing for your next move.
Lawful Zones (White Highlight)
Lawful Zones are areas where PvP is limited. If you are a lawful player, you cannot attack or be attacked by neutral or chaotic players. However, neutral and chaotic players can still engage in PvP with each other.
PvP Zones (No Highlight)
In PvP Zones, combat is enabled for everyone. Lawful, neutral, and chaotic players can all attack and be attacked. These areas are high-risk and great for players looking for action and rewards.
Chaotic Zone Warning (Yellow Highlight)
Yellow-highlighted areas indicate you are approaching the Chaotic Zone at the center of the map. This is a warning to prepare yourself or turn back if you’re not ready for the risks ahead.
Chaotic Zone (Red Highlight)
The Chaotic Zone is the most dangerous part of the Abandoned Ruins. Entering this area will turn you chaotic, and if you die here, you lose everything in your inventory. Only venture into the Chaotic Zone if you are ready to face the ultimate challenge.
Point of Intrest List
| Name | Coords |
|---|---|
| Ironfang Siege Post | -463, -52
|
| Outlaws Barricade | -445, -279
|
| Stonefang Castle | -43, -438
|
| Infernos Rest | 274, -172
|
| Emberclaw Hold | 260, -426
|
| Bandits Keep | 264, 347
|
| Blackthorn Keep | 249, 176
|
| Grimwood Retreat | 188, -91
|
| Driftwood Fortress | -137, -154
|
| Old Man's House | -136, 21
|
| Church House | 319, 449
|
| Scorched Hollow | 184, -298
|
| The Ruined Castle | -265, 362
|
| Ashenvale | 395, -205
|
| Marketplace | 83, 355
|
| Rivervale Village | -281, -399
|
| Gusty Grove | -304, -42
|
| The King's Castle | 63, -50
|
| Outlaws Hollow | 417, 132
|
| Rogues Refuge | -235, 140
|
| The Drowned Shacks | 429, -11
|
| Withered Tower | -60, 331
|
Bandit King

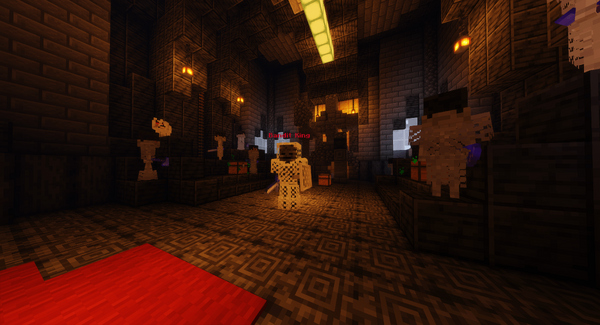
Location: The Bandit King is found in the center castle of the first instance of the Abandoned Ruins Adventure.